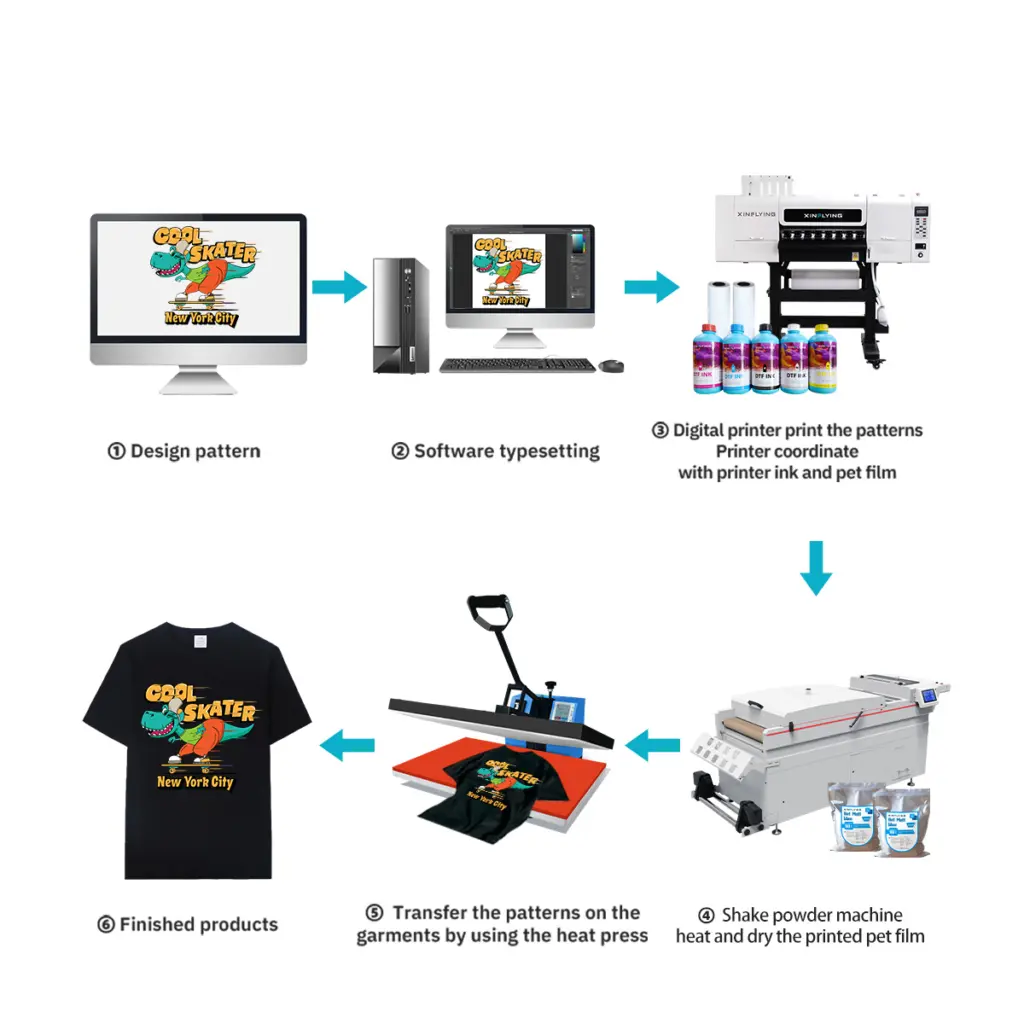
Das erste Einrichten eines DTF-Druckers kann überwältigend sein, Aber der Prozess ist unkompliziert, sobald Sie die Schritte kennen. Egal, ob Sie gerade einen A3-DTF-Drucker der Einstiegsklasse für Ihr Heimstudio oder ein kommerzielles 24-Zoll-Gerät für Ihre Druckerei gekauft haben, Dieser Leitfaden führt Sie durch alles – vom Auspacken bis zum Drucken Ihrer ersten Überweisung.
Was Sie benötigen, bevor Sie beginnen
Bevor Sie Ihr Gerät einschalten, Stellen Sie sicher, dass Sie Folgendes bereit haben:
- DTF-Drucker (mit Netzkabel und USB/Ethernet-Kabel)
- DTF-Pigmenttinte (CMYK + Weiß)
- DTF-PET-Folie (Heiße und kalte Peeling-Optionen)
- Schmelzklebstoffpulver
- RIP-Software (wie Maintop, Fotoausdruck, oder Flexi)
- Ein Computer, auf dem Windows ausgeführt wird 10 oder später
- Heißpressmaschine (für den Transferschritt)
Schritt 1: Wählen Sie den richtigen Standort
Stellen Sie Ihren DTF-Drucker auf einen stabilen Untergrund, Flache Oberfläche mit genügend Freiraum auf allen Seiten – mindestens 30 cm links und rechts für die Medienzuführung und -sammlung. Halten Sie den Drucker von direkter Sonneneinstrahlung fern, Staub, und Feuchtigkeit, da diese die Druckqualität und die Lebensdauer des Druckkopfs beeinträchtigen können.
Ideale Umgebung:
- Temperatur: 20–30°C (68–86°F)
- Feuchtigkeit: 40–60 % relative Luftfeuchtigkeit
- Belüftung: Guter Luftstrom empfohlen, speziell für die Pulverhärtung
Schritt 2: Packen Sie den Drucker aus und überprüfen Sie ihn
Entfernen Sie sorgfältig alle Verpackungsmaterialien, inklusive Schaumstoffblöcken, Schutzbänder, und Transportsicherungen im Inneren des Druckers. Diese müssen unbedingt entfernt werden – wenn sie an Ort und Stelle bleiben, kann der Druckkopfschlitten beim Einschalten beschädigt werden.
Überprüfen Sie Folgendes, bevor Sie fortfahren:
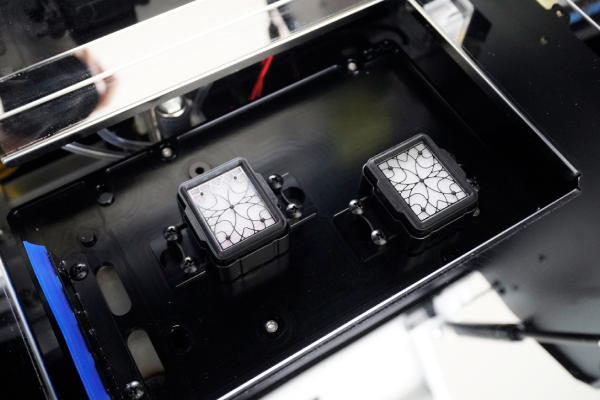
- Der Druckkopf ist sauber und unbeschädigt
- Die Tintenschläuche sitzen richtig
- Pulverschüttler und Trocknereinheit (wenn integriert) verbunden sind
- Alle Kabel und Zubehörteile sind im Lieferumfang enthalten
Schritt 3: Installieren Sie den Druckertreiber
- Stecken Sie das mitgelieferte USB-Laufwerk ein oder laden Sie den Treiber von der Website des Herstellers herunter
- Führen Sie das Installationsprogramm aus und befolgen Sie die Anweisungen auf dem Bildschirm
- Verbinden Sie Ihren Drucker über ein USB- oder Ethernet-Kabel mit dem Computer
- Bestätigen Sie, dass der Drucker angezeigt wird Geräte und Drucker auf Ihrem Windows-System
Tipp: Installieren Sie immer den Treiber, bevor Sie das USB-Kabel anschließen, sofern vom Installateur nicht anders angegeben.
Schritt 4: Installieren und konfigurieren Sie die RIP-Software
RUHE IN FRIEDEN (Rasterbildverarbeitung) Software ist für den DTF-Druck unerlässlich – sie steuert die Tintendichte, weiße Tintenschichten, Farbprofile, und Druckgeschwindigkeit. Ohne es, Sie können keine professionellen Ergebnisse erzielen.
Einrichtungsschritte:
- Installieren Sie Ihre RIP-Software (Großmars 6.1 wird häufig mit Xinflying-Druckern verwendet)
- Fügen Sie Ihr Druckermodell aus der Geräteliste hinzu
- Laden Sie das von Ihrem Druckerhersteller bereitgestellte ICC-Farbprofil
- Stellen Sie den Druckmodus ein:
- Zuerst die Farbschicht auftragen, dann Weiß (Standard für DTF)
- Deckkraft der weißen Tinte: beginnen bei 100% und basierend auf den Testergebnissen anpassen
- Druckauflösung einstellen: 600×1200 dpi für Standardqualität; 720×1440 dpi für feine Details
Schritt 5: Füllen Sie das Tintensystem
DTF-Drucker verwenden ein Massentintensystem mit separaten Patronen oder Tanks für jeden Farbkanal: Cyan, Magenta, Gelb, Schwarz, und Weiß.
- Schütteln Sie die Weiße Tinte Füllen Sie die Flasche vor dem Befüllen 2–3 Minuten lang gründlich aus – weiße Tinte setzt sich schnell ab und muss gut gemischt werden
- Füllen Sie jeden Tank bis zum angegebenen Füllstand, Überfüllung vermeiden
- Füllen Sie das Tintensystem über das Wartungspanel des Druckers auf – dadurch wird Tinte durch die Schläuche zum Druckkopf geleitet
- Führen Sie a aus Düsenprüfung um zu bestätigen, dass alle Kanäle korrekt feuern
Wichtig: Weiße Tinte erfordert eine häufigere Wartung als CMYK. Wenn der Drucker länger als im Leerlauf ist 24 Std., Führen Sie vor dem Drucken einen kurzen Reinigungszyklus durch.
Schritt 6: Laden Sie den DTF-Film
Der DTF-Druck erfolgt auf PET-Folie, kein Stoff. Der Film wird wie Standard-Rollenmedien in den Drucker eingelegt.
- Befestigen Sie die Filmrolle am Medienhalter an der Rückseite des Druckers
- Führen Sie den Film durch die Walze und richten Sie ihn an den Kantenführungen aus
- Stellen Sie sicher, dass druckbar (beschichtet) Seite zeigt nach oben – Dies ist normalerweise die glänzendere oder leicht klebrige Seite
- Stellen Sie die Medienbreite sowohl im Bedienfeld des Druckers als auch in der RIP-Software ein
- Stellen Sie sicher, dass der Film reibungslos und ohne Schräglauf transportiert wird
Schritt 7: Drucken Sie ein Testmuster
Bevor ein vollständiger Job ausgeführt wird, Drucken Sie immer ein Düsentestmuster:
- Im Bedienfeld des Druckers, geh zu Wartung → Düsenprüfung
- Drucken Sie das Testmuster auf ein kleines Stück Folie
- Überprüfen Sie das Ergebnis – alle Linien sollten gerade und ununterbrochen sein
- Falls Düsen fehlen, laufe a Kopfreinigung Zyklus durchführen und die Prüfung wiederholen
Sobald der Düsentest sauber ist, Drucken Sie ein kleines Testbild (10×10 cm) um die Farbgenauigkeit zu überprüfen, weiße Tintendichte, und Ebenenausrichtung.
Schritt 8: Tragen Sie Klebepulver auf
Nach dem Drucken, Der Film kommt mit nasser Tinte heraus, die vor dem Aushärten mit Klebstoffpulver aufgetragen werden muss.
Manuelle Methode:
- Gießen Sie Schmelzklebstoffpulver über den bedruckten Bereich, während die Tinte noch feucht ist
- Überschüssiges Pulver vorsichtig abschütteln – es sollte nur Pulver zurückbleiben, das an der nassen Tinte haften bleibt
- Klopfen Sie auf die Rückseite der Folie, um loses Pulver zu entfernen
Automatisierte Methode (integrierte Schütteleinheit): Die meisten kommerziellen DTF-Drucker verfügen über einen automatischen Pulverapplikator – der Film gelangt direkt vom Drucker in die Pulverzone, dann in den Härteofen.
Tipp: Verwenden Sie feines Pulver (80–120 Maschen) für detaillierte Designs und gröberes Pulver für dicke Stoffe.
Schritt 9: Härten Sie das Pulver aus
Das Klebepulver muss geschmolzen und ausgehärtet werden, um eine ordnungsgemäße Verbindung mit der Druckschicht herzustellen.
- Ofen-/Tunneltrockner: 130–160°C für 2–3 Minuten (für die Produktion empfohlen)
- Hitzepresse: 160°C für 30–60 Sekunden, kein druck, Deckel leicht öffnen, damit Feuchtigkeit entweichen kann
Das ausgehärtete Transferpapier sollte leicht glänzend erscheinen und das Pulver sollte vollständig geschmolzen sein – es sollten keine weißen Körnchen sichtbar sein.
Schritt 10: Auf Stoff übertragen
Jetzt kann Ihr DTF-Transfer auf Kleidungsstücke aufgetragen werden.
- Erhitzen Sie den Stoff auf der Heißpresse 6–10 Sekunden lang auf 160 °C, um Feuchtigkeit zu entfernen
- Positionieren Sie die Transferfolie auf dem Kleidungsstück (bedruckte Seite nach unten)
- Drücken Sie auf 160–165°C bei mittlerem Druck für 6–10 Sekunden
- Ziehen Sie die Folie heiß ab (heißer Peelfilm) oder abkühlen lassen (Kaltschälfolie)
- Für beste Haltbarkeit, mach ein zweites Drücken für 10 Sekunden mit einer Silikonfolie darüber
Beheben häufiger Einrichtungsprobleme
| Problem | Wahrscheinliche Ursache | Lösung |
|---|---|---|
| Fehlende Düsen im Testdruck | Verstopfter Druckkopf oder Luft in der Tintenleitung | Führen Sie den Kopfreinigungszyklus 2–3 Mal durch |
| Weiße Tinte wird nicht gedruckt | Weiße Tinte setzt sich ab oder der Schlauch ist verstopft | Weiße Tinte schütteln, Führen Sie eine Spülung der weißen Tinte durch |
| Filmverzerrung während des Vorschubs | Falsche Ausrichtung der Kantenführung | Richten Sie die Führungen neu aus, Reduzieren Sie die Druckgeschwindigkeit |
| Pulver haftet nicht gleichmäßig | Tinte zu wenig gesättigt oder Film auf falscher Seite | Überprüfen Sie die Einstellungen für die Tintendichte; Flip-Film |
| Peeling nach dem Waschen übertragen | Unzureichender Aushärte- oder Pressdruck | Presszeit oder Temperatur erhöhen |
Wartungstipps für einen reibungslosen Betrieb Ihres DTF-Druckers
- Täglich: Führen Sie vor dem ersten Druck einen Düsentest durch; Verschließen Sie den Druckkopf, wenn er nicht verwendet wird
- Wöchentlich: Reinigen Sie die Verschließstation, Wischerblatt, und Encoderstreifen
- Monatlich: Überprüfen Sie die Anschlüsse der Tintenschläuche und reinigen Sie das Innere des Pulverschüttlers
- Weiße Tinte: Täglich umrühren oder zirkulieren lassen, um ein Absetzen zu verhindern
Häufig gestellte Fragen
Q: Kann ich jede beliebige Tinte in meinem DTF-Drucker verwenden?? A: NEIN. Verwenden Sie immer Tinte, die speziell für den DTF-Druck entwickelt wurde und mit Ihrem Druckkopfmodell kompatibel ist (Z.B., Epson I3200-A1 oder XP600). Die Verwendung inkompatibler Tinte kann den Druckkopf dauerhaft beschädigen.
Q: Benötige ich einen separaten Pulverstreuer und Trockner?? A: Einstiegsdrucker erfordern einen manuellen Pulverauftrag und eine eigenständige Heißpresse zum Aushärten. Kommerzielle Modelle wie die von Xinflying verfügen über integriertes Pulverschütteln und Aushärten in einer einzigen Einheit, Dadurch wird der Arbeitsablauf vollständig automatisiert.
Q: Wie lange dauert eine DTF-Übertragung?? A: Eine ordnungsgemäß aufgetragene DTF-Übertragung hält stand 40+ Waschzyklen ohne nennenswertes Ausbleichen, wenn hochwertige Tinte und korrekte Pressparameter verwendet werden.
Q: Welche Stoffe eignen sich für den DTF-Druck?? A: DTF funktioniert auf Baumwolle, Polyester, Nylon, Mischungen, Denim, und elastische Stoffe – keine Vorbehandlung erforderlich, im Gegensatz zum DTG-Druck.
Abschluss
Die korrekte Einrichtung eines DTF-Druckers von Anfang an erspart Ihnen stundenlange Fehlerbehebung. Die wichtigsten Schritte – richtige Umgebung, saubere Düsen, kalibrierte RIP-Einstellungen, und richtige Pressparameter – das zeichnet scharf aus, dauerhafte Transfers aus schlechten Ergebnissen.
Wenn Sie nach einem DTF-Drucker suchen, der vollständige Setup-Unterstützung bietet, technische Fernunterstützung, und kostenlose Bedienerschulung, Entdecken Sie das DTF-Druckersortiment von Xinflying – von kompakten A3-Desktop-Geräten bis hin zu großvolumigen 48-Zoll-Industriemaschinen.