Setting up a DTF printer for the first time can feel overwhelming, but the process is straightforward once you know the steps. Whether you’ve just purchased an entry-level A3 DTF printer for your home studio or a commercial 24-inch machine for your print shop, this guide walks you through everything — from unboxing to printing your first transfer.
What You’ll Need Before You Start
Before powering on your machine, make sure you have the following ready:
- Drukarka DTF (with power cable and USB/ethernet cable)
- DTF pigment ink (CMYK + Biały)
- Folia PET DTF (hot and cold peel options)
- Hot melt adhesive powder
- Oprogramowanie RIP (such as Maintop, Fotograwiura, or Flexi)
- A computer running Windows 10 or later
- Heat Maszyna prasowa (for the transfer step)
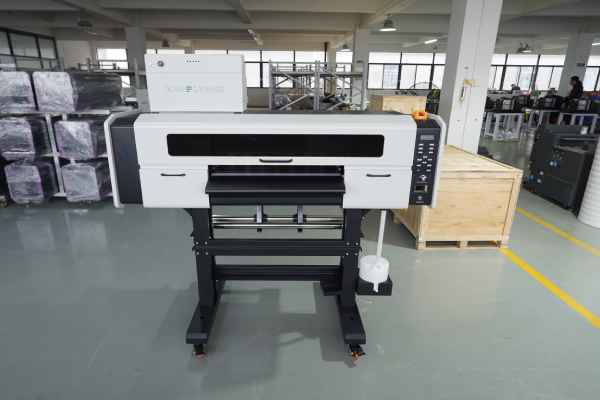
Krok 1: Choose the Right Location
Place your DTF printer on a stable, flat surface with enough clearance on all sides — at least 30cm on the left and right for media feeding and collection. Keep the printer away from direct sunlight, pył, and humidity, as these can affect print quality and printhead lifespan.
Ideal environment:
- Temperatura: 20–30°C (68–86°F)
- Wilgotność: 40–60% wilgotności względnej
- Ventilation: Good airflow recommended, especially for powder curing
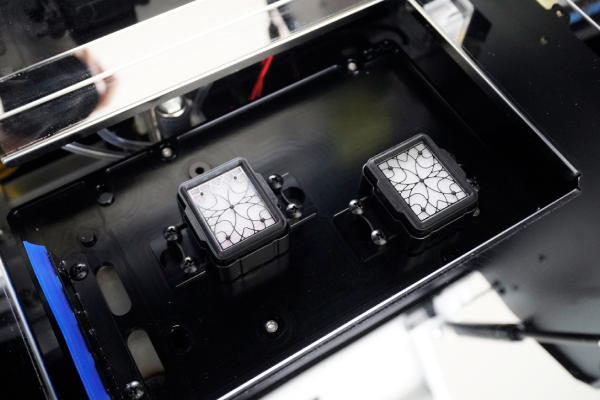
Krok 2: Unbox and Inspect the Printer
Carefully remove all packaging materials, including foam blocks, protective tapes, and transit locks inside the printer. These are critical to remove — leaving them in place can damage the printhead carriage when you power on.
Check the following before proceeding:
- Printhead is clean and undamaged
- Ink tubes are properly seated
- Powder shaker and dryer unit (if integrated) are connected
- All cables and accessories are included
Krok 3: Install the Printer Driver
- Insert the included USB drive or download the driver from the manufacturer’s website
- Run the installer and follow the on-screen instructions
- Connect your printer to the computer via USB or ethernet cable
- Confirm the printer appears in Devices and Printers on your Windows system
Tip: Always install the driver before connecting the USB cable, unless instructed otherwise by the installer.
Krok 4: Install and Configure RIP Software
ROZERWAĆ (Raster Image Processing) software is essential for DTF printing — it controls ink density, warstwy białego atramentu, color profiles, and print speed. Without it, you cannot achieve professional results.
Setup steps:
- Install your RIP software (ambonka 6.1 is commonly used with Xinflying printers)
- Add your printer model from the device list
- Load the ICC color profile provided by your printer manufacturer
- Set the print mode:
- Color layer first, then White (standard for DTF)
- White ink opacity: start at 100% and adjust based on test results
- Set print resolution: 600×1200 dpi for standard quality; 720×1440 dpi for fine detail
Krok 5: Fill the Ink System
DTF printers use a bulk ink system with separate cartridges or tanks for each color channel: Cyjan, Magenta, Żółty, Czarny, and White.
- Shake the Biały atrament bottle thoroughly for 2–3 minutes before filling — white ink settles quickly and must be mixed well
- Fill each tank to the indicated level, avoiding overfilling
- Prime the ink system using the printer’s maintenance panel — this draws ink through the tubes to the printhead
- Run a nozzle check to confirm all channels are firing correctly
Important: White ink requires more frequent maintenance than CMYK. If the printer sits idle for more than 24 godziny, run a short cleaning cycle before printing.
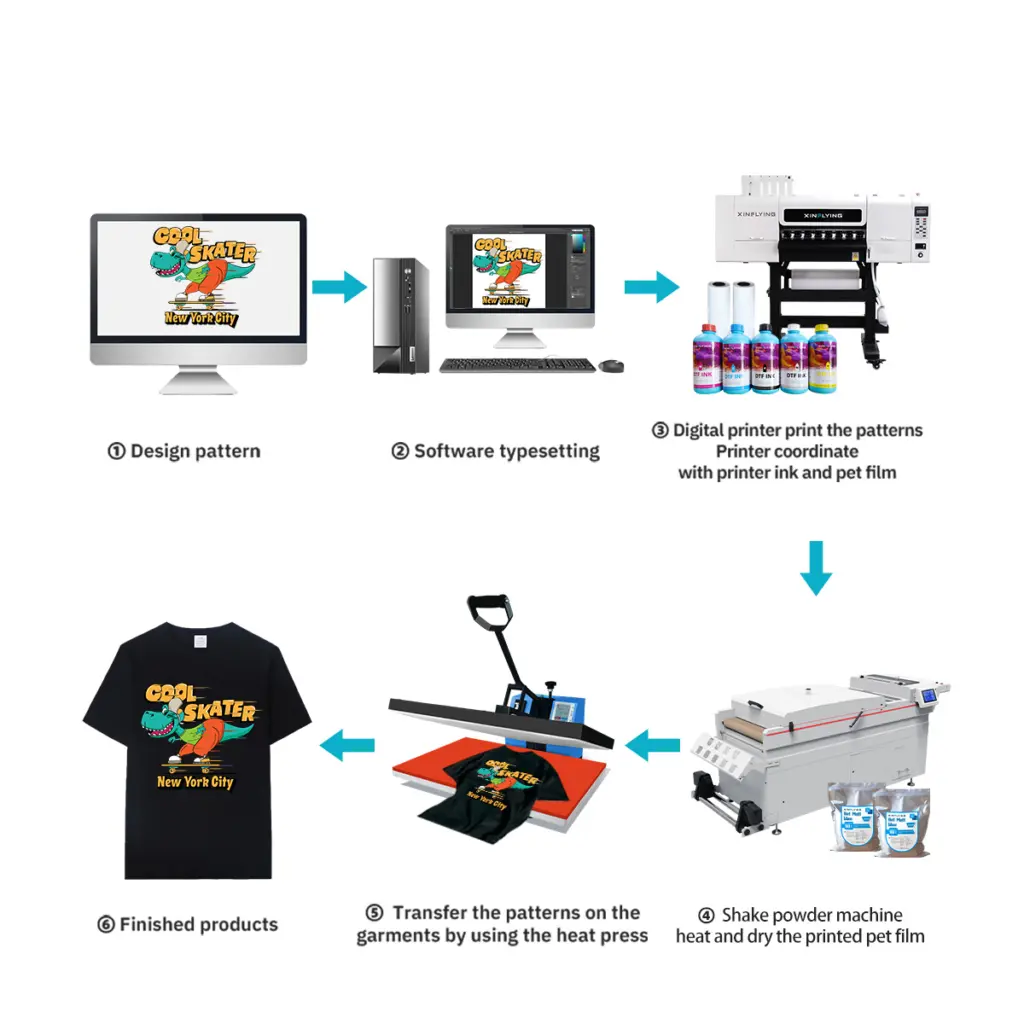
Krok 6: Load the DTF Film
DTF printing is done on PET film, not fabric. The film is loaded into the printer like standard roll media.
- Mount the film roll on the media holder at the rear of the printer
- Feed the film through the platen and align it with the edge guides
- Ensure the printable (pokryty) side faces up — this is usually the shinier or slightly tacky side
- Set the media width in both the printer control panel and RIP software
- Confirm the film feeds smoothly without skewing
Krok 7: Print a Test Pattern
Before running a full job, always print a nozzle check pattern:
- In the printer control panel, go to Maintenance → Nozzle Check
- Print the test pattern onto a small piece of film
- Inspect the result — all lines should be straight and unbroken
- If any nozzles are missing, run a Head Cleaning cycle and repeat the check
Once the nozzle check is clean, print a small test image (10×10 cm) to verify color accuracy, white ink density, and layer alignment.
Krok 8: Apply Adhesive Powder
Po wydrukowaniu, the film comes out with wet ink that needs adhesive powder applied before curing.
Manual method:
- Pour hot melt adhesive powder over the printed area while the ink is still wet
- Shake off excess powder gently — only powder that sticks to the wet ink should remain
- Tap the back of the film to remove any loose powder
Automated method (integrated shaker unit): Most commercial DTF printers include an automatic powder applicator — the film passes directly from the printer into the powder zone, then into the curing oven.
Tip: Use fine powder (80–120 mesh) for detailed designs and coarser powder for thick fabrics.
Krok 9: Utwardź proszek
The adhesive powder must be melted and cured to bond properly with the print layer.
- Oven/tunnel dryer: 130–160°C for 2–3 minutes (recommended for production)
- Prasa termiczna: 160°C for 30–60 seconds, no pressure, lid slightly open to allow moisture to escape
The cured transfer should appear slightly glossy and the powder should be fully melted — no white granules should be visible.
Krok 10: Transfer to Fabric
Now your DTF transfer is ready to be applied to garments.
- Preheat the fabric on the heat press at 160°C for 6–10 seconds to remove moisture
- Position the transfer film on the garment (printed side down)
- Press at 160–165°C with medium pressure for 6–10 seconds
- Peel the film while hot (hot peel film) or allow to cool (cold peel film)
- For best durability, do a second press Do 10 seconds with a silicone sheet on top
Troubleshooting Common Setup Issues
| Problem | Likely Cause | Rozwiązanie |
|---|---|---|
| Missing nozzles in test print | Clogged printhead or air in ink line | Run head cleaning cycle 2–3 times |
| White ink not printing | White ink settled or tube blocked | Shake white ink, run white ink purge |
| Film skewing during feed | Incorrect edge guide alignment | Re-align guides, reduce print speed |
| Powder not sticking evenly | Ink under-saturated or film wrong side | Check ink density settings; flip film |
| Transfer peeling after wash | Insufficient curing or press pressure | Increase press time or temperature |
Maintenance Tips to Keep Your DTF Printer Running Smoothly
- Codziennie: Run a nozzle check before the first print; cap the printhead when not in use
- Tygodnik: Clean the capping station, wiper blade, and encoder strip
- Miesięczny: Check ink tube connections and clean the inside of the powder shaker
- Biały atrament: Stir or circulate daily to prevent settling
Często zadawane pytania
Q: Can I use any ink in my DTF printer? A: NIE. Always use ink formulated specifically for DTF printing and compatible with your printhead model (NP., Epson I3200-A1 or XP600). Using incompatible ink can permanently damage the printhead.
Q: Do I need a separate powder shaker and dryer? A: Entry-level printers require manual powder application and a standalone heat press for curing. Commercial models like those from Xinflying include integrated powder shaking and curing in a single unit, making the workflow fully automated.
Q: How long does a DTF transfer last? A: A properly applied DTF transfer can withstand 40+ wash cycles without significant fading when high-quality ink and correct pressing parameters are used.
Q: What fabrics work with DTF printing? A: DTF works on cotton, poliester, nylon, mieszanki, dżinsowa, and elastic fabrics — no pre-treatment required, unlike DTG printing.
Wniosek
Setting up a DTF printer correctly from the start saves hours of troubleshooting down the line. The key steps — proper environment, clean nozzles, calibrated RIP settings, and correct pressing parameters — are what separate sharp, durable transfers from poor results.
If you’re looking for a DTF printer that comes with full setup support, zdalna pomoc techniczna, and free operator training, explore Xinflying’s DTF printer range — from compact A3 desktop units to high-volume 48-inch industrial machines.