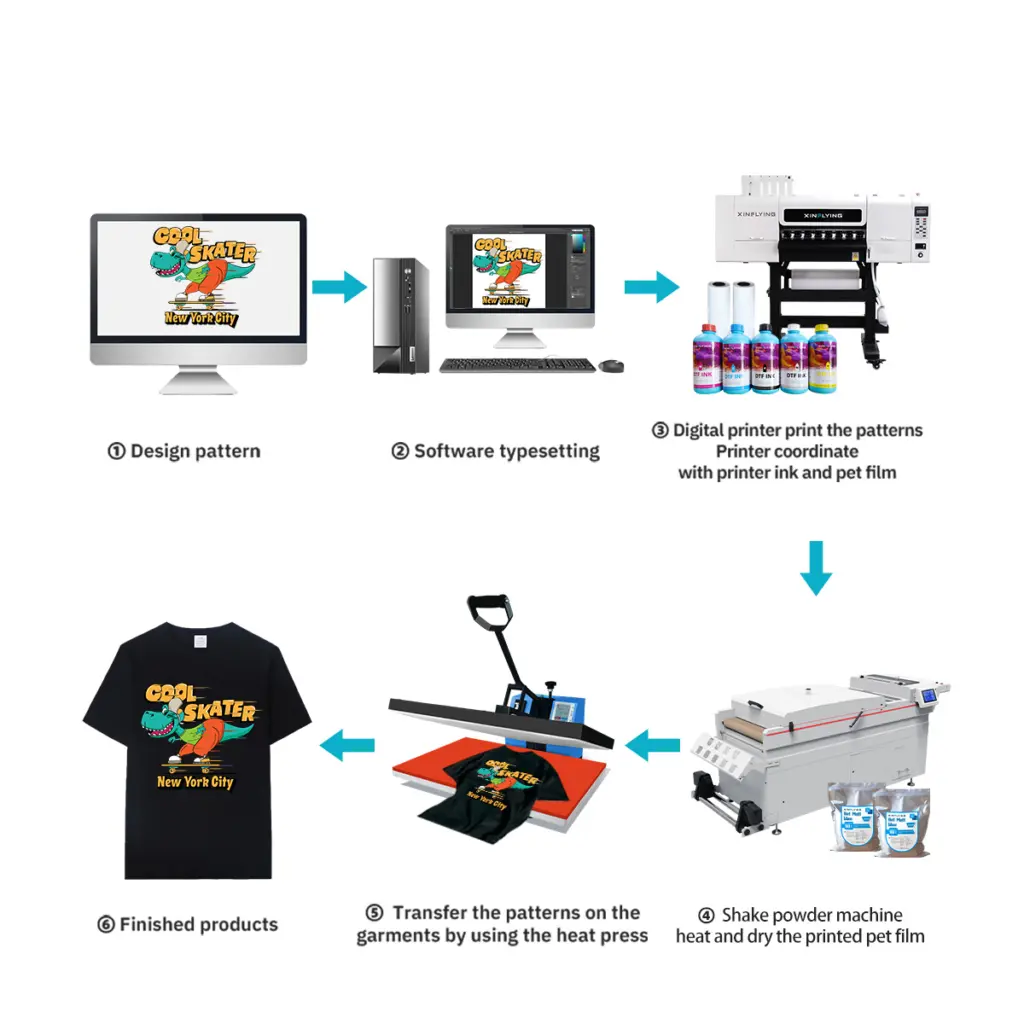
قد يكون إعداد طابعة DTF لأول مرة أمرًا مرهقًا, لكن العملية واضحة بمجرد معرفة الخطوات. سواء كنت قد اشتريت للتو طابعة A3 DTF للمبتدئين للاستوديو المنزلي الخاص بك أو آلة تجارية مقاس 24 بوصة لمطبعتك, يرشدك هذا الدليل خلال كل شيء — بدءًا من فتح العلبة وحتى طباعة النقل الأول.
ما ستحتاجه قبل أن تبدأ
قبل تشغيل جهازك, تأكد من أن لديك ما يلي جاهز:
- طابعة دي تي إف (مع كابل الطاقة وكابل USB/إيثرنت)
- حبر الصباغ DTF (كميك + أبيض)
- فيلم DTF PET (خيارات التقشير الساخنة والباردة)
- مسحوق لاصق يذوب بالحرارة
- برنامج مزق (مثل مينتوب, طباعة الصور الفوتوغرافية, أو فليكسي)
- جهاز كمبيوتر يعمل بنظام Windows 10 أو في وقت لاحق
- ماكينة الضغط الحراري (لخطوة النقل)
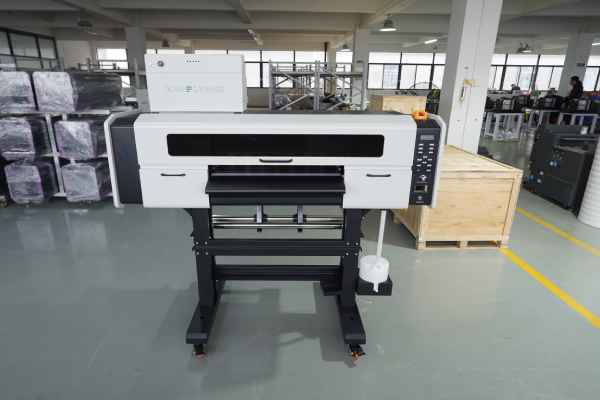
خطوة 1: اختر الموقع المناسب
ضع طابعة DTF الخاصة بك على مستقر, سطح مستو مع خلوص كافٍ من جميع الجوانب — على الأقل 30 سم على اليسار واليمين لتغذية الوسائط وجمعها. احتفظ بالطابعة بعيدًا عن ضوء الشمس المباشر, تراب, والرطوبة, لأن ذلك قد يؤثر على جودة الطباعة وعمر رأس الطباعة.
بيئة مثالية:
- درجة حرارة: 20-30 درجة مئوية (68-86 درجة فهرنهايت)
- رطوبة: 40-60% رطوبة نسبية
- تهوية: يوصى بتدفق هواء جيد, خاصة لمعالجة المسحوق
خطوة 2: افتح علبة الطابعة وافحصها
قم بإزالة جميع مواد التغليف بعناية, بما في ذلك كتل الرغوة, أشرطة واقية, وأقفال العبور داخل الطابعة. من الضروري إزالتها — فتركها في مكانها يمكن أن يؤدي إلى تلف حامل رأس الطباعة عند تشغيله.
تحقق مما يلي قبل المتابعة:
- رأس الطباعة نظيف وغير تالف
- تم تثبيت أنابيب الحبر بشكل صحيح
- وحدة شاكر المسحوق والمجفف (إذا متكاملة) متصلة
- يتم تضمين جميع الكابلات والملحقات
خطوة 3: قم بتثبيت برنامج تشغيل الطابعة
- أدخل محرك أقراص USB المرفق أو قم بتنزيل برنامج التشغيل من موقع الشركة المصنعة على الويب
- قم بتشغيل برنامج التثبيت واتبع التعليمات التي تظهر على الشاشة
- قم بتوصيل الطابعة بالكمبيوتر عبر USB أو كابل إيثرنت
- تأكد من ظهور الطابعة في الأجهزة والطابعات على نظام ويندوز الخاص بك
نصيحة: قم دائمًا بتثبيت برنامج التشغيل قبل توصيل كابل USB, ما لم يطلب منك المثبت خلاف ذلك.
خطوة 4: تثبيت وتكوين برنامج RIP
قطع (معالجة الصور النقطية) يعد البرنامج ضروريًا لطباعة DTF - فهو يتحكم في كثافة الحبر, طبقات الحبر الأبيض, ملفات تعريف الألوان, وسرعة الطباعة. بدونها, لا يمكنك تحقيق نتائج احترافية.
خطوات الإعداد:
- قم بتثبيت برنامج RIP الخاص بك (com.maintop 6.1 يشيع استخدامه مع طابعات Xinflying)
- أضف طراز الطابعة الخاصة بك من قائمة الأجهزة
- قم بتحميل ملف تعريف ألوان ICC الذي توفره الشركة المصنعة للطابعة
- اضبط وضع الطباعة:
- طبقة اللون أولا, ثم الأبيض (معيار DTF)
- عتامة الحبر الأبيض: تبدأ في 100% وضبطها بناءً على نتائج الاختبار
- ضبط دقة الطباعة: 600× 1200 نقطة في البوصة للجودة القياسية; 720× 1440 نقطة في البوصة للحصول على تفاصيل دقيقة
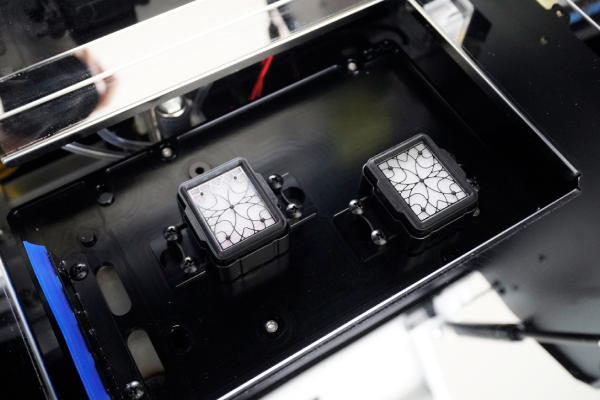
خطوة 5: املأ نظام الحبر
تستخدم طابعات DTF نظام الحبر السائب مع خراطيش أو خزانات منفصلة لكل قناة ألوان: سماوي, أرجواني, أصفر, أسود, والأبيض.
- هز حبر أبيض قم بتعبئة الزجاجة جيدًا لمدة 2-3 دقائق قبل التعبئة - يستقر الحبر الأبيض بسرعة ويجب خلطه جيدًا
- املأ كل خزان إلى المستوى المحدد, تجنب الملء الزائد
- قم بتجهيز نظام الحبر باستخدام لوحة الصيانة الخاصة بالطابعة، حيث يقوم هذا بسحب الحبر عبر الأنابيب إلى رأس الطباعة
- تشغيل أ فحص الفوهة للتأكد من أن جميع القنوات تعمل بشكل صحيح
مهم: يتطلب الحبر الأبيض صيانة متكررة أكثر من CMYK. إذا ظلت الطابعة في وضع الخمول لأكثر من 24 ساعات, قم بتشغيل دورة تنظيف قصيرة قبل الطباعة.
خطوة 6: قم بتحميل فيلم DTF
تتم طباعة DTF على فيلم PET, ليس النسيج. يتم تحميل الفيلم في الطابعة مثل وسائط البكرات القياسية.
- قم بتركيب لفة الفيلم على حامل الوسائط الموجود في الجزء الخلفي من الطابعة
- قم بتغذية الفيلم من خلال السطح الزجاجي وقم بمحاذاته مع موجهات الحافة
- تأكد من للطباعة (المغلفة) يواجه الجانب لأعلى — عادةً ما يكون هذا هو الجانب اللامع أو المبتذل قليلاً
- قم بتعيين عرض الوسائط في كل من لوحة التحكم الخاصة بالطابعة وبرنامج RIP
- تأكد من تغذية الفيلم بسلاسة دون انحراف
خطوة 7: طباعة نمط الاختبار
قبل تشغيل وظيفة كاملة, قم دائمًا بطباعة نموذج فحص الفوهة:
- في لوحة التحكم الخاصة بالطابعة, اذهب الى الصيانة → فحص الفوهة
- اطبع نموذج الاختبار على قطعة صغيرة من الفيلم
- افحص النتيجة - يجب أن تكون جميع الخطوط مستقيمة وغير متقطعة
- إذا كانت هناك أي فوهات مفقودة, تشغيل أ تنظيف الرأس دورة وكرر الاختيار
بمجرد أن يصبح فحص الفوهة نظيفًا, طباعة صورة اختبار صغيرة (10× 10 سم) للتحقق من دقة الألوان, كثافة الحبر الأبيض, ومحاذاة الطبقة.
خطوة 8: تطبيق مسحوق لاصق
بعد الطباعة, يخرج الفيلم بحبر مبلل يحتاج إلى مسحوق لاصق قبل المعالجة.
الطريقة اليدوية:
- قم بسكب مسحوق لاصق مذوب بالحرارة على المنطقة المطبوعة بينما لا يزال الحبر رطبًا
- تخلصي من المسحوق الزائد بلطف، حيث يجب أن يبقى فقط المسحوق الذي يلتصق بالحبر الرطب
- اضغط على الجزء الخلفي من الفيلم لإزالة أي مسحوق سائب
الطريقة الآلية (وحدة شاكر متكاملة): تشتمل معظم طابعات DTF التجارية على أداة وضع مسحوق أوتوماتيكية - حيث يمر الفيلم مباشرة من الطابعة إلى منطقة المسحوق, ثم إلى فرن المعالجة.
نصيحة: استخدمي مسحوقًا ناعمًا (80-120 شبكة) للتصميمات التفصيلية والمسحوق الخشن للأقمشة السميكة.
خطوة 9: علاج المسحوق
يجب إذابة المسحوق اللاصق ومعالجته ليرتبط بشكل صحيح بطبقة الطباعة.
- فرن / مجفف النفق: 130-160 درجة مئوية لمدة 2-3 دقائق (الموصى بها للإنتاج)
- الصحافة الحرارة: 160درجة مئوية لمدة 30-60 ثانية, لا ضغط, الغطاء مفتوح قليلاً للسماح للرطوبة بالهروب
يجب أن يبدو النقل المُعالج لامعًا قليلاً ويجب أن يذوب المسحوق بالكامل - ولا يجب أن تكون أي حبيبات بيضاء مرئية.
خطوة 10: نقل إلى النسيج
الآن أصبح تحويل DTF الخاص بك جاهزًا للتطبيق على الملابس.
- قم بتسخين القماش بالضغط الحراري على حرارة 160 درجة مئوية لمدة 6-10 ثوانٍ لإزالة الرطوبة
- ضع فيلم النقل على الملابس (الجانب المطبوع للأسفل)
- اضغط على 160-165 درجة مئوية مع ضغط متوسط لمدة 6-10 ثواني
- قشر الفيلم وهو ساخن (فيلم قشر ساخن) أو السماح لتبرد (فيلم قشر بارد)
- للحصول على أفضل متانة, افعل أ الصحافة الثانية ل 10 ثواني مع وضع طبقة سيليكون في الأعلى
استكشاف مشكلات الإعداد الشائعة وإصلاحها
| مشكلة | السبب المحتمل | حل |
|---|---|---|
| فوهات مفقودة في طباعة الاختبار | رأس الطباعة مسدود أو الهواء في خط الحبر | قم بتشغيل دورة تنظيف الرأس 2-3 مرات |
| الحبر الأبيض لا يطبع | الحبر الأبيض استقر أو انسداد الأنبوب | هز الحبر الأبيض, قم بتشغيل عملية تطهير الحبر الأبيض |
| انحراف الفيلم أثناء التغذية | محاذاة دليل الحافة غير صحيحة | إعادة محاذاة الأدلة, تقليل سرعة الطباعة |
| مسحوق لا يلتصق بالتساوي | الحبر غير مشبع أو يغلف الجانب الخطأ | تحقق من إعدادات كثافة الحبر; فيلم الوجه |
| نقل التقشير بعد الغسيل | علاج غير كاف أو ضغط الصحافة | زيادة وقت الضغط أو درجة الحرارة |
نصائح الصيانة للحفاظ على تشغيل طابعة DTF بسلاسة
- يوميًا: قم بإجراء فحص الفوهة قبل الطباعة الأولى; قم بتغطية رأس الطباعة عند عدم استخدامه
- أسبوعي: تنظيف محطة السد, شفرة ممسحة, وشريط التشفير
- شهريا: تحقق من توصيلات أنبوب الحبر وقم بتنظيف الجزء الداخلي من شاكر المسحوق
- حبر أبيض: تحريك أو تعميم يوميا لمنع الاستقرار
الأسئلة المتداولة
س: هل يمكنني استخدام أي حبر في طابعة DTF الخاصة بي؟? أ: لا. استخدم دائمًا الحبر المصمم خصيصًا لطباعة DTF والمتوافق مع طراز رأس الطباعة الخاص بك (على سبيل المثال, إبسون I3200-A1 أو XP600). قد يؤدي استخدام حبر غير متوافق إلى إتلاف رأس الطباعة بشكل دائم.
س: هل أحتاج إلى شاكر مسحوق منفصل ومجفف؟? أ: تتطلب الطابعات ذات المستوى المبتدئ تطبيقًا يدويًا للمسحوق وضغطًا حراريًا مستقلاً للمعالجة. تشتمل النماذج التجارية مثل تلك المقدمة من Xinflying على اهتزاز ومعالجة المسحوق المتكامل في وحدة واحدة, جعل سير العمل مؤتمتًا بالكامل.
س: ما المدة التي تستغرقها عملية نقل DTF؟? أ: يمكن أن يتحمل نقل DTF المطبق بشكل صحيح 40+ دورات غسيل دون بهتان كبير عند استخدام حبر عالي الجودة ومعلمات الضغط الصحيحة.
س: ما هي الأقمشة التي تعمل مع طباعة DTF? أ: يعمل DTF على القطن, البوليستر, نايلون, يمزج, الدنيم, والأقمشة المرنة - لا تحتاج إلى معالجة مسبقة, على عكس طباعة DTG.
خاتمة
يؤدي إعداد طابعة DTF بشكل صحيح من البداية إلى توفير ساعات من استكشاف الأخطاء وإصلاحها باستمرار. الخطوات الأساسية — البيئة المناسبة, فوهات نظيفة, إعدادات RIP المعايرة, ومعلمات الضغط الصحيحة — هي ما يميز حاد, التحويلات الدائمة من النتائج السيئة.
إذا كنت تبحث عن طابعة DTF تأتي مع دعم الإعداد الكامل, المساعدة الفنية عن بعد, وتدريب المشغلين مجانًا, استكشف مجموعة طابعات DTF الخاصة بـ Xinflying - بدءًا من وحدات سطح المكتب صغيرة الحجم مقاس A3 وحتى الأجهزة الصناعية كبيرة الحجم مقاس 48 بوصة.